Check out Part 1 and Part 2 of this 3-part series on migrating a WordPress site to a JAMstack. This is the most technical post of the series: you’ll get details on everything from content models to GraphQL queries. Click here if you want to skip straight to our conclusions (What are the gotchas? Would we use this again?).

Now that we’d selected our specific JAMstack to build a flexible, performant site for our client, it was time to roll up our sleeves and dive in.
Getting started with Contentful + Gatsby was simple — each has helpful starter guides on how to work with the other. Check out this sample Gatsby github project and Contentful’s quickstart guide for setting up a space using Gatsby.
Creating Content Models in Contentful: Pros, Cons, and Workarounds
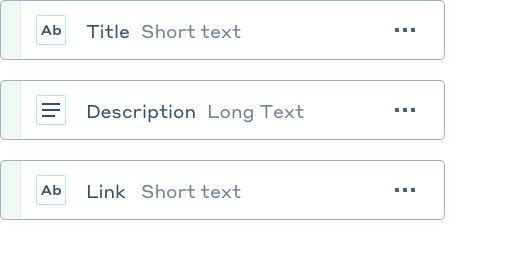
To construct our content models, we didn’t need to define our schemas in code or use an external plugin like ACF for WordPress. Contentful’s data model felt quite sophisticated, and its documentation gave us a handy list of available fields.
The only functionality that Contentful lacked was a repeater field, which is pretty much what it sounds like: a set of reusable, repeatable sub-fields. This is a common use case that platforms like WordPress solve with Advanced Custom Fields. We needed this for moderately complex information whose structure repeated on a particular page, but didn’t appear throughout the site. For instance, a blog post that includes a series of Q&As or a list of related stories.
To compensate, we created Content Types for the field and used the Reference field to that content type (e.g. creating a list that had references to a content type list item). For simpler cases in which a whole new content type wasn’t warranted, we just used the List field with custom-formatted values that could be parsed in the code. For example, to input social links, we required the name and URL to be separated by a pipe symbol (“|”), like so: Facebook|http://facebook.com/person.
Using CSS Modules for Component-Based Architecture
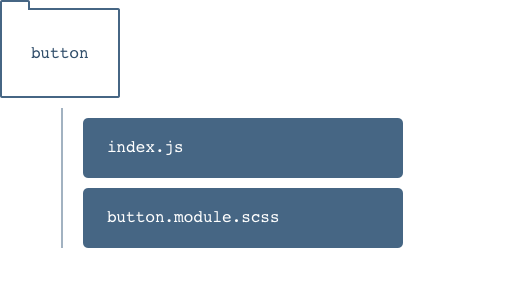
Like React, Gatsby encourages the use of components, which are the reusable building blocks of your site. A component can be simple, like a button, or complex, like a slider. When following a component based architecture, it makes sense for everything to follow this structure, including your stylesheet. Enter CSS Modules. They are the final ingredient in making your component a self-contained package that includes logic, markup, and styles all in one place.
Ok, cool. But how exactly do they work? Put simply, they limit the scope of class names. With CSS modules, the corresponding styles only apply to that component. That saves us the headache of determining unique, descriptive class names. Unlike naming conventions like BEM, where scope has to be included in the name itself, CSS modules are scoped when they are compiled. This means you can write simple, straightforward names (see examples below). We love this approach because it simplifies our development effort — code stays predictable and DRY.
Button Classes
.buttonWrapper
.button
Compiled Button Classes
.src-components-Button----button-module---buttonWrapper---3s1zQ
.src-components-Button----button-module---button---1Tg9s
One common misconception: You don’t have to style the entire site using CSS modules (and we didn’t). We still wanted to set up logical base styles for common pieces like typography. When using a component from a package, we followed the component’s styling approach. For example, we used react-slick, a package that enabled us to use the slick.js slider plugin. This component came with baked-in styles, so we followed their styling pattern. Had we forced CSS modules upon it, we would have repeated styles for the same component in various places.
Using GraphQL
To tell our Gatsby pages what data they needed from Contentful, we needed to write GraphQL queries. Hooking into Gatsby’s createPages API, we queried for all the IDs of our Contentful content type and then passed that into the associated template. From there, we had a GraphQL query that took in the passed ID and then queried for the fields needed to display the content. We were able to use GraphQL Fragments to make sure that our queries were reusable and no one query was too long. GraphQL also allowed us to sort our data by fields and format dates right in our query so we didn’t need to parse any strings or mutate the array of objects we received. Luckily, Gatsby has GraphiQL, an interactive GraphQL editor that allowed us to test our queries before plugging them into our components.
export const pageQuery = graphql`
  query companyQuery($id: String!) {
    contentfulCompany(id: { eq: $id }) {
      name
      slug
      website
      press {
        id
      }
      founder
      founderTitle
      ...CompanyContent
      ...CompanyImagery
      ...CompanyMetaList
    }
    ...SiteQuery
  }
`;
Creating a Blogging System with Images in Contentful
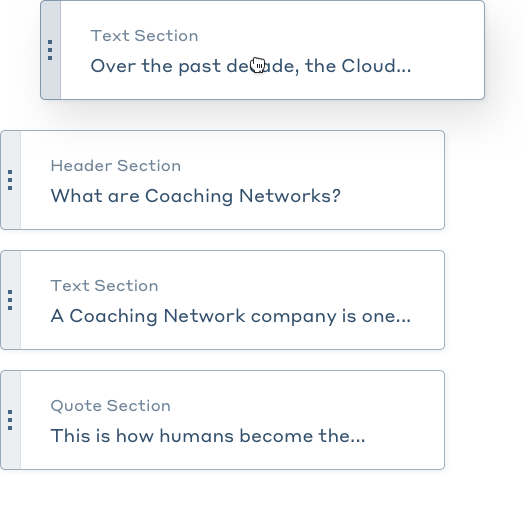
Our client needed a robust blogging system with a flexible structure that could be used by multiple editors. To build it in Contentful, we created content types for each type of blog section (e.g. text, header, and list sections). This allowed an editor to craft a blog post using a combination of these drag-and-drop section elements.
One drawback was that Contentful’s default text editor didn’t allow the uploading and captioning of images. It wanted us to create a separate content type to handle images, their captions, and their alignment — not user friendly at all. This meant editors would have to break up their story with messy looking in-line instructions. In order to make life easier, we created a Contentful Extension, which lets developers work with custom software through an iframe in the Contentful interface.
This allowed us to integrate Redactor, a WYSIWYG editor that makes it easy to handle images and see how styles will look on the front-end. It’s powerful, configurable, and gets the seal of approval from Craft CMS, who uses it as their primary writing interface. We hooked up Redactor to Contentful’s events and used Contentful’s Content Management API to upload inline images directly into our space. We then deployed the extension to Netlify and registered it to our Contentful Spaces.
Environments + Deployment Process
When setting up our build environment, we typically like to have access to three spaces: develop, staging, and production. Contentful’s Team Edition came with 15 users and 3 spaces, which would have been ideal — but it also cost $249/month (about $3k/year). At the time of this writing, a Contentful Developer+ Edition cost only $39/month (under $500/year), but only gave us 5 users and 2 spaces. With such a drastic price difference, we went with the Developer+ Edition, deciding to work around the limitations.
Through Netlify, we set up branch deploys, a preview build generated from a branch that is not the production branch. These deploys are published to a URL which includes the branch name as a prefix. Our workflow included three branches:
masterfor our production buildstagingfor our staging builddevelopfor our working development build
The production space powered both our production and staging builds, though only the staging build pulled in Contentful drafts. Additionally, we used the staging space to power our development build.
When we were ready to merge in a release, we went through the following steps:
- Create a release branch off of the
developbranch - Merge the release into the
stagingbranch, which triggers a deployment to staging - If there are any content model changes, make them in our production space and wait until our staging deployment builds successfully
- Once it builds and we know that our release is stable, merge the release into our master branch, triggering a production build
- Finally, run a custom script leveraging Contentful’s Content Migration APIs to sync up our production space to our staging space
GOTCHAS: Snags we hit (and how we fixed them)
Allowing Non-Existent Optional Fields in GraphQL Queries
GraphQL can only query fields that are pre-defined in its schema, but Gatsby generates this schema from our site’s existing data. This means if we have a GraphQL query checking for a field that doesn’t exist in Contentful, GraphQL will throw an error and the site will fail to build. This matters the most when we have optional fields. For instance, if we had an optional field called Twitter on our “Company” content type, but none of the companies had used that field yet, the site would fail to build because it would be querying for a field with no data.
Solution: For now, create dummy content and make sure that they match all the fields. There are ongoing talks about this in Gatsby issues and there is a plugin that facilitates setting a default value that looks promising.
Pagination and Filtering in Static Site Generators
Pagination and filtering in static site generators meant that we’d have to either:
1. Statically create all the paginated pages.
- Pro: Because these pages are statically generated, we wouldn’t see a decrease in page speed — and we could paginate without needing any client-side JavaScript.
- Con: If we wanted filters as well as pagination, we’d have to generate every filter page as well. In the case of pages with a lot of content, this increases the build time of the site.
2. Render all the to-be-paginated content and use JavaScript to paginate dynamically.
- Pro: We’d be able to manipulate the content as much as we wanted.
- Con: In cases where there was a lot of content, we’d have to load it all first — which would slow down pagespeed. However, we could mitigate that by using third party APIs (like Algolia) — but that route would require more money, plus time to learn a new service.
Solution: We chose to go with the first option for the site’s blog pages, because that content was going to grow the most. We went with the second option for the page that listed and filtered a set of companies since there weren’t that many and they didn’t need be paginated.
CSS Module Challenges: Theming + Modernizr
While CSS modules generally increased development velocity, there were a few situations where it created challenges.
Theming
When we started the project, we jumped right into building without considering theming. Once we needed to theme a component based on its view, we realized that integrating a solution like React CSS Themr would have required significant refactoring and should have been included at the beginning.
Solution: Instead of refactoring, we added an optional theme prop to all themeable components. This prop was then applied to the outer layer of the component as a class, which was leveraged by the corresponding CSS module to apply specific theme styles.
While this solution was sufficient in our case, we encourage anyone building a themeable site to consider their options before building because it can significantly impact your setup.
Modernizr
Modernizr is a collection of tests that determine which features your browser has to offer. The output of Modernizr is a collection of classes added to your site’s <html> that describe which features are present and which are missing. Unfortunately, CSS modules only care about local scope, which means they can’t access classes on their parents.
Solution: To work around this, we added additional global classes to some components in order to style them differently in the event that a feature wasn’t supported.
While this solution was simple, it dissolved the predictability associated with CSS modules because components with overrides needed an additional stylesheet.
Would we do it over? For sure.
All in all, working with Gatsby, Contentful, and Netlify was enjoyable and exciting. Even though this was our first time using this stack, clear documentation made for a straightforward build process that should only get simpler as these technologies continue to mature and as their communities grow. The Gatsby community is already hard at work trying to solve the GraphQL schema issue mentioned above. If we had to use this stack again, we’d be eager to implement some of their suggested solutions as it was the only technical challenge we encountered that didn’t have an adequate fix.
From a non-technical perspective, we’d have to re-evaluate Contentful because their prices have since increased to a level that could be considered unaffordable. Going forward, we’d welcome using JAMstack again if the goals of the project aligned with the technology — and we encourage others to try it out as well.
Have you tried a JAMstack? We’d love to hear about your experience. Hit us up in the comments below!
PS: If you enjoyed this series, be sure to keep following along on our blog and check out more of our work. Oh, also: we’re hiring.