
At Upstatement, we recently wrapped up a project where one of the more notable engineering tasks was implementing global search for a large WordPress multisite network. We were tasked with revamping the web experience for a college of a large university, and each school under this college had its own individual site within the broader network.
Building websites for higher-ed is not for the faint of heart. Unless executed properly, these websites can quickly spin into deep labyrinths of information. That’s why we decided to make search a prominent and easily accessible feature of the site we were working on (and subsequently every site in the network). Rather than jam-packing the top navigation with nested menus and links, we empowered the user to take the path of least resistance to their desired destination — via a global search box in the navigation bar of every page.
Setting up search with Algolia
Choosing Algolia to build search for our WordPress multisite network was a no-brainer. Not only were our clients familiar with and happy with what Algolia had to offer, but we’ve also successfully built many sites with the tool over the years. Since we’re tech agnostic here at Upstatement, a big advantage of using Algolia with our projects is that they have robust SDKs for whichever tech stack we’re using.
Typically, there are three main steps to integrate Algolia into a project:
- Indexing your data
- Optimizing your data relevance
- Building your front-end search experience
In a typical web project, indexing data would probably not be a big deal. Most likely, you would install the Algolia npm package, throw all of your searchable data into a JSON file, push it up to Algolia, and call it a day.
Indexing data for a WordPress site, however, is a little more complex. Due to the way content is managed and stored in WordPress, the data we wish to index requires more work on our end in order to be formatted in a way that Algolia understands. The editorial nature of WordPress also requires us to make sure our Algolia records are kept in sync with the latest and greatest content available in our database. In other words, content should be searchable as soon as it’s published.

In the past, WordPress developers have reached for the Algolia search plugin as a solution. But as of 2019, Algolia officially dropped support for their plugin, encouraging developers to use their new PHP client instead. According to their integration guide, the best way to go about doing this is by creating a custom WordPress plugin. And spoiler alert: that’s what we did!
Defining our Algolia landscape
Before we began building out our plugin, we had to answer one key question:
How should we structure our indices to account for our different search UIs?
Initially, we assumed we would create one index per site — this way we would be able to differentiate between which search results came from which site. However, we quickly realized that this wouldn’t make much sense, as the vast majority of the content in our multisite network would be managed in the main site.
We also considered having one index per post type, but this proved to add more complexity than simplicity. How we organized our indices really came down to how we wanted to search and display our records. And from both an engineering and design perspective, building search for multiple indices created unnecessary constraints.
So, in order to best serve our global navigation search along with our other search UIs (think: people directories), we decided that we really only needed one global index. When we needed to distinguish between content from separate sites or different post types, we would filter and facet our records using their attributes.
Setting the scene
Once we had a plan in place for organizing our data, we set out to build our plugin. Since we were working with a multisite network, we were able to Network Activate our plugin in the network admin dashboard in order to include the content of every site in our global search. From a high level, our plugin served three main purposes:
- Providing custom WP CLI commands to import existing content
- Automatically reindexing records when a post is saved in the WP admin
- Setting the configuration of our Algolia indices
Importing existing content with WP CLI
Since we were revamping the site of a large higher-ed institution, we inevitably had to migrate thousands of preexisting posts from their old site. But how were we going to make 3000+ posts searchable?

Using the WP CLI, we were able to expose CLI commands for triggering operations to push data from our WordPress database up to Algolia via the PHP client. To do this, our plugin had an Algolia_Command class that looked a bit like this:
With WP_CLI::add_command(), we added our commands to the algolia namespace so we could run them in our terminals like so:
wp algolia reindex
wp algolia get_config
wp_algolia set_config
The reindex command did most of the heavy lifting — indexing the content of every site in our network. Here’s a quick breakdown of what happened every time we ran wp algolia reindex:
- For each site in our multisite network, loop through the searchable post types
- For each searchable post type, query for posts
- Format those posts into a format that Algolia understands
- Save those serialized posts in Algolia
Check out a pared down version of that reindex function below:
In case you missed it, there’s a few important things to note in the code snippet above:
- We’re using
switch_to_blog()andrestore_current_blog()to query posts from each site in our multisite network - We’re using
WP_Queryto query for published posts (we don’t want to index drafts or trashed posts) - We’re running each post returned by the query through a filter to serialize the data and split large records
- We’re pushing and saving the records to Algolia via the
saveObjects()method
Serializing posts into Algolia records
For each searchable post type, we had a corresponding filter to handle serializing records. We used each post’s post_type attribute to dynamically interpolate the proper serialization filter to pass it through.
$filter_name = $post->post_type.'_to_record';So, if we were serializing a post type of monkey, that post would be passed through the monkey_to_record filter. In our plugin, these filters lived in a class called AlgoliaSerializer, which looked something like this:
The serializeRecord() method was doing most of the heavy lifting — it merged custom attributes we expected from different post types with universal WP post attributes (post_type, post_title, post_date, etc.). It also called the splitContent() method, which handled the important task of (you guessed it) splitting large records.
Splitting large records
Since Algolia is not meant to be a database, record splitting is important for performance and search relevance. It’s recommended that each record in Algolia should only be about a few kilobytes, so we needed to make sure our records were split effectively.
In our implementation, the splitter function split the post_content field into chunks of 1000 characters. This meant that if a post had a post_content field with 5000 characters, five almost identical records would be created. Each of these five records had identical attributes, except for the post_content, distinct_key, and objectID attributes.
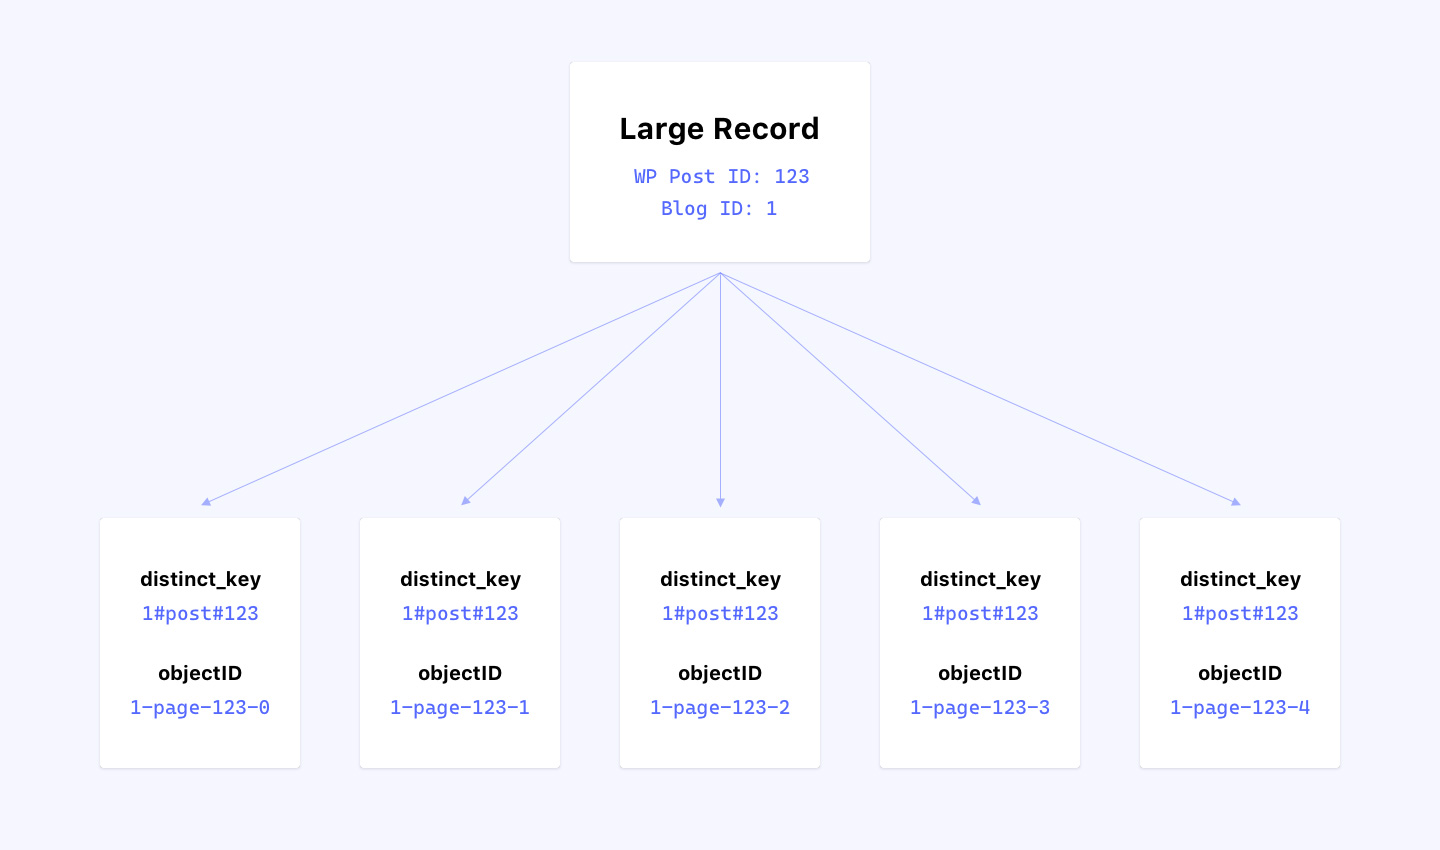
The distinct_key was the attribute used to relate each of the five records together, while the objectID was the unique attribute used to differentiate the records from each other. Then, when we implemented the search UI, all we had to do was use the distinct parameter to deduplicate the results.
Automatically updating records
With manually importing existing content covered, our plugin also had to make sure that our Algolia records were automatically kept in sync with our database.

We did this by hooking into WordPress’s save_post action:
This meant that if a new post was published, we created a new record in our index for it. If an existing post was updated, we would re-serialize the record and replace its existing Algolia record. If a post was trashed, we deleted the record in Algolia altogether. And of course, for all of these operations, we made sure each post’s split records were kept in sync.
Configuring Algolia settings
The last thing our custom plugin took care of was configuring our Algolia records for relevancy, which is a fancy way of saying we told Algolia how to display search results in a meaningful way. To do this, we configured a bunch of settings on the Algolia end, such as searchable attributes, facets to filter results by, attributes to highlight, etc.
Our custom plugin took care of pushing up these configuration settings to Algolia with more WP CLI commands. For example, here is the function that powered the wp algolia set_config — settings command:
This function called our filter algolia_get_settings, which handled pulling the data from a JSON file in the algolia-json directory to push up the configuration of our global search index to Algolia.
Our global_search-settings.json file looked something like this:
Making sure to keep our local JSON files up to date, we would run the wp algolia set_config --settings command after every deployment to ensure our Algolia indices all used the same settings.
Once those configuration settings were pushed up, our Algolia index was ready to go! We had everything in place to build our search UI.
Working with multiple environments
For this particular project, we had four environments to account for: local, development, staging, and production. You may have been wondering how our plugin was able to distinguish between these environments. Certainly we didn’t use our local test data in our production environment!
We ended up managing two Algolia apps. One containing our local development index and another containing three separate indices for our dev, staging, and prod environments. To handle this in our plugin, we used environment-specific prefixes to ensure each environment was isolated.
What exactly does that mean? For each environment (local, dev, staging, and prod) we had a different ALGOLIA_INDEX_PREFIX variable for prepending our Algolia index names. Every time we referred to a specific index, we used a filter to construct the canonical index name based on the ALGOLIA_INDEX_PREFIX.
So if ALGOLIA_INDEX_PREFIX=local, our plugin would use the local_wp_global_search index. In turn, our dev, staging, and prod environments were assigned their own unique ALGOLIA_INDEX_PREFIXes.
TL;DR
We integrated Algolia search with our WordPress multisite network by rolling our own custom plugin. This plugin served three purposes:
- Providing custom WP CLI commands to import existing content
- Automatically reindexing records when a post is saved in the WP admin
- Setting the configuration of our Algolia indices
With just a few keystrokes, we were able to quickly get WordPress content synced in Algolia, allowing us to easily stand up a global search box to better serve our site’s users.